Unit 3: Formulas and Functions
| Site: | Newgate University Minna - Elearning Platform |
| Course: | Computer Applications and Systems |
| Book: | Unit 3: Formulas and Functions |
| Printed by: | Guest user |
| Date: | Thursday, 1 October 2026, 2:57 PM |
1. Excel Formulas
Microsoft Excel is an electronic spreadsheet that automates manual calculations involved in accounting and bookkeeping. After you have typed the basic text and number entries in a spreadsheet cell, Excel can perform the math calculations for you. Formulas are entered in the worksheet cell and must begin with an equal sign "=". The formula then includes the addresses of the cells whose values will be manipulated with appropriate operands placed in between. After the formula is typed into the cell, the calculation executes immediately and the formula itself is visible in the formula bar.
Example formulas are: =D15+D18+D21: =B4-B12: =A10/B15: =(B16+C16) *1.07
Do not use any spaces in formulas. Also, when creating formulas, you may choose to either type the cell address or use the mouse to select the cell address.
You can create any type of math calculation on your own using the following mathematical operators:
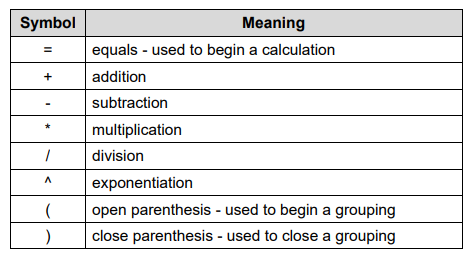
Excel follows the mathematical order of hierarchy where operators are processed in the order: negation, exponentiation, multiplication/division, and then addition/subtraction. Use parentheses to clarify the order of calculation in a formula. To view the actual formula in a cell and its components, double-click on the cell or click once and press F2. Also, if you select the cell, you will see the formula or function for the cell in the Formula Bar.
Basic steps for creating a formula:
1. Click in the empty cell which will contain the formula.
2. Type an equal sign (=).
3. Type the cell address or click the cell that contains the first number.
4. Type the math operator (+ - / * ^).
5. Type the cell address or click the cell that contains the second number.
6. Continue in this manner until the formula is complete.
7. Use parenthesis for clarification.
8. Press the Enter key.
2. Excel Functions
Instead of manually typing a formula into the formula bar, you can use the Formula Ribbon to insert common functions such as Sum, Date, Average, Count, Max, etc. Functions provide an automated method for creating formulas in the following categories: financial, date and time, math and trigonometry, statistical, lookup and reference, database, text, logical and information. Excel contains more than 200 functions.
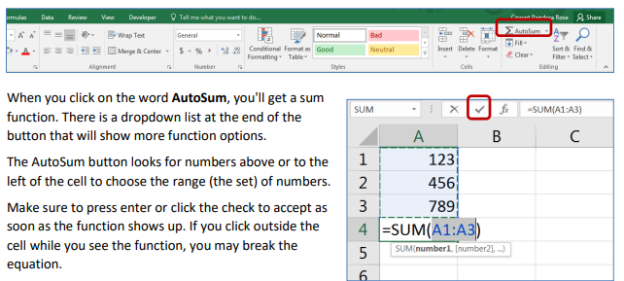
For example, specific functions are available to calculate a sum, an average, a loan payment, logarithms and random numbers. Functions can be typed, if you know the syntax, or can be inserted by clicking on the Function button located left of the formula bar.
All functions are formatted in a similar manner, for example: = function name (parameters). The parameters vary depending upon the function. Functions and cell addresses may be typed in upper case or lower case.
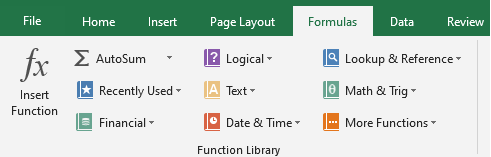
Activate the cell where the function will be placed and select Insert Function from the Formula Ribbon. From the Insert Function dialog box, you can enter a description of what you want to do or you can select a category. Browse through the functions by clicking in the Select a Function menu choices. As each function name is highlighted a description and example of use is provided below the box. Click OK to select a function.
The next window allows you to choose the cells that will be included in the function. Excel will suggest a range that it thinks might be relevant to where your cursor is; notice that there is a colon in between the range of cells. If you would like Excel to use a different range, you can place your cursor in the field and edit the default range. (Remember to include the colon.) Click OK when all the cells for the function have been selected.